
 02:43
02:43
 All In One's Blog

| Troubleshooting your Air Conditioning System Mengatasi Masalah Sistem penyejuk udara Anda | ||||||||||||
| 1 ) The first thing I do is insert a temperature gauge in the middle air vent ( the middle vent gives you the most accurate reading ) 1) Hal pertama yang saya lakukan adalah menyisipkan pengukur suhu udara di tengah lubang angin (ventilasi tengah memberikan Anda yang paling akurat) | 2 ) Now you need to look at the compressor to see if the clutch is cycling (clicking on and off). 2) Sekarang anda perlu untuk melihat kompresor untuk melihat apakah kopling adalah bersepeda (mengklik dan off). If it is, then most likely you are just a bit low on freon. Jika ya, maka kemungkinan besar Anda hanya sedikit rendah freon. (Skip to step 11). (Skip ke langkah 11). If it is not cycling proceed to step 3 Jika tidak bersepeda lanjutkan ke langkah 3 | 3 ) There are three reasons the air conditioning compressor clutch will not engage or turn on. 3) Ada tiga alasan kopling kompresor AC tidak akan terlibat atau aktifkan. | ||||||||||
| ||||||||||||
|
| ||||||||||||
|
| ||||||||||||
| Start the car and turn the air conditioning to Max and take a temperature reading. Buat mobil dan menghidupkan AC untuk Max dan mengambil suhu membaca. This gives you a starting point. Ini memberi Anda titik awal. After all you want it cooler than it already is or you wouldn't be messing with it. Setelah semua yang Anda inginkan itu lebih keren daripada yang sudah ada atau Anda tidak akan bermain-main dengan hal itu. | ||||||||||||
| This some times takes 10 - 30 seconds Between cycles. Ini beberapa kali mengambil 10-30 detik Antara siklus. You want to see the inside of the clutch spinning along with the outside when turned on (engaged) Anda ingin melihat bagian dalam kopling berputar bersama dengan dunia luar ketika dinyalakan (bertunangan) | ||||||||||||
| Write down the starting temperature reading for reference later in the repair procedure. Catat suhu mulai membaca untuk referensi kemudian dalam prosedur perbaikan. | ||||||||||||
| Now we just need to diagnose the problem and decide what coarse of action we need to take. Sekarang kita hanya perlu mendiagnosis masalah dan memutuskan apa tindakan kasar yang perlu kita ambil. | ||||||||||||
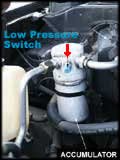
| 4 ) Evacuate (remove) the freon from the system with an approved evacuation machine. 4) Evakuasi (hapus) yang freon dari sistem evakuasi yang telah disetujui mesin. Disconnect the Air Conditioning lines from the compressor. Lepaskan garis penyejuk udara dari kompresor. Remove the belt from the Air Conditioning Compressor. Lepaskan sabuk dari Kompresor penyejuk udara. Disconnect any electrical connections. Putus semua sambungan listrik. Remove the bolts that hold the Compressor in place. Lepaskan baut yang memegang Kompresor pada tempatnya. Install the replacement compressor in the reverse order. Instal penggantian kompresor dalam urutan terbalik. Then proceed to step 10. Kemudian lanjutkan ke langkah 10. | 5 ) Ok, the Air Conditioning Compressor Clutch will not engage, so lets figure out why not. 5) Ok, penyejuk Air Compressor Clutch tidak akan terlibat, sehingga memungkinkan mencari tahu mengapa tidak. With the ignition key on, unplug the low pressure switch (clutch cycling switch) and place a jumper wire across the connector. Dengan kunci kontak on, lepaskan tekanan rendah switch (saklar bersepeda kopling) dan menempatkan kawat jumper konektor di seberang. The switch is generally located on the side of the accumulator. Saklar umumnya terletak di sisi akumulator. If the compressor clutch does not click in then you need to check for Battery Voltage at the connector. Jika kopling kompresor tidak klik maka Anda perlu untuk memeriksa Baterai Tegangan pada konektor. | 6 ) If No battery voltage is present, then check the fuse. 6) Jika tegangan baterai Tidak hadir, kemudian cek sekering. If the fuse is good you will need to repair the wiring between the fuse and the low pressure switch connector. Jika sekering yang baik Anda perlu untuk memperbaiki kabel-kabel antara sekering dan konektor saklar tekanan rendah. | ||||||||||
| 7 ) If there is battery voltage at the low pressure switch connector and the clutch does not click in when the jumper wire is attached, then you will need to move to the A/C Clutch Relay. 7) Jika ada tegangan baterai pada konektor saklar tekanan rendah dan kopling tidak klik ketika kawat jumper terpasang, maka Anda akan perlu untuk pindah ke A / C Clutch Relay. | ||||||||||||
| *NOTE* Most all manufacturers require the system be flushed. * CATATAN * Kebanyakan semua produsen memerlukan sistem akan memerah. Also required are the replacement of the Accumulator and orifice tube for warranty purposes. Juga diperlukan adalah penggantian Accumulator dan lubang tabung untuk keperluan garansi. |
|
| ||||||||||
| 8 ) Make sure you have good battery positive and ground at the relay. 8) Pastikan Anda memiliki baterai baik positif dan tanah di relay. If you do not receive a 2nd battery voltage when the jumper wire is attached, then the wire may need to be replaced. Jika Anda tidak menerima tegangan baterai 2 ketika kawat jumper terpasang, maka kawat mungkin perlu diganti. | ||||||||||||
| 9 ) If you do have Power leaving the A/C Clutch Relay and heading to the compressor but not power at the clutch, then replace the wire between the two. 9) Jika Anda memiliki Power meninggalkan A / C Clutch Relay dan menuju kompresor tapi tidak kekuasaan di kopling, kemudian mengganti kawat antara keduanya. If you have power at the compressor AND IT DOES NOT Click in (engage) then you need to replace the compressor. Jika Anda memiliki kekuatan di kompresor DAN TIDAK TI Klik di (terlibat), maka anda perlu mengganti kompresor. Refer to step 4 Lihat langkah 4 | ||||||||||||
|
| ||||||||||||
| If you do have 2 positives, a good ground but do not see power leaving to the compressor clutch you will need to replace the Air Condition Clutch Relay. Jika Anda memiliki 2 positif, tanah yang baik tetapi tidak melihat kuasa meninggalkan ke kopling kompresor anda perlu mengganti Air Condition Clutch Relay. |
| |||||||||||
|
| ||||||||||||
| 10 ) Once the Air Conditioning System has been open or is completely empty you will need to draw 30 psi of vacuum on the system. 10) Setelah Sistem penyejuk udara telah dibuka atau sudah benar-benar kosong, Anda perlu untuk menarik 30 psi dari pada sistem vakum. Once you have drawn vacuum on the system it is a good idea to see if it can hold that vacuum for at least an hour to make sure there are no leaks. Sekali Anda telah ditarik pada sistem vakum ini adalah ide yang baik untuk melihat apakah ia dapat terus yang vakum selama sedikitnya satu jam untuk memastikan tidak ada kebocoran. You can use an air compressor attachment or an Air Conditioning machine to draw the vacuum on the system. Anda dapat menggunakan lampiran kompresor udara atau mesin penyejuk udara untuk menarik pada sistem vakum. An A/C machine will draw vacuum from both the high pressure side and the low pressure side ports. A / C mesin penyedot akan menarik baik dari sisi tekanan tinggi dan sisi tekanan rendah pelabuhan. | 10 b ) Now that you have vacuum on the system, leave the gauges connected to the low pressure port. 10 b) Sekarang bahwa Anda memiliki pada sistem vakum, meninggalkan terhubung ke pengukur tekanan rendah pelabuhan. You can attach a can of freon to the center hose or the port you used to draw vacuum. Anda dapat melampirkan kaleng freon ke pusat selang atau port yang digunakan untuk menggambar vakum. . . | |||||||||||
| 11 )You are ready to add refrigerant. 11) Anda siap untuk menambahkan pendingin. If you haven't already done so, connect your fill line to the low pressure port. Jika Anda belum melakukannya, menghubungkan mengisi baris ke tekanan rendah pelabuhan. After you connect the center port of your A/C gauges to a can refrigerant, start the vehicle and turn on the air conditioner and set it to MAX. Setelah Anda menghubungkan pelabuhan pusat Anda A / C alat pengukur untuk pendingin dapat, mulai kendaraan dan menyalakan pendingin udara dan setel ke MAX. Next slowly open the low pressure manifold and let the freon flow into the system. Selanjutnya perlahan membuka manifold tekanan rendah dan membiarkan freon mengalir ke dalam sistem. Run the engine at 1500 rpm to allow the compressor to suck all the freon in. You may need to install a jumper wire at the low pressure switch connector to get the compressor going at first. Jalankan mesin pada 1500 rpm untuk membiarkan kompresor menghisap semua freon masuk Anda mungkin perlu memasang kabel jumper pada konektor saklar tekanan rendah untuk mendapatkan kompresor terjadi pada awalnya. Do this un till you see 45-55 psi on the gauges at 1500 rpm. Lakukan ini sampai Anda melihat un 45-55 psi di alat pengukur pada 1500 rpm. | ||||||||||||
|
| ||||||||||||
| An Air compressor style or electric vacuum pump will only need to draw vacuum on the low pressure side. Sebuah gaya kompresor udara atau pompa vakum listrik hanya akan perlu untuk menarik vakum pada sisi tekanan rendah. The pump will connect to the low pressure port through a set of vacuum gauges . Pompa akan terhubung ke port tekanan rendah melalui satu set alat pengukur vakum. The Port is generally located on the accumulator but always found on the low pressure side of the system. Port ini umumnya terletak di akumulator tetapi selalu ditemukan pada sisi tekanan rendah dari sistem. |
| 12 ) This will give you maximum cooling capabilities. 12) Ini akan memberi Anda kemampuan pendinginan maksimal. Follow instructions on the Can of freon. Ikuti petunjuk pada Bisakah dari freon. Once filled take another temperature reading and compare it to your initial reading. Setelah diisi mengambil suhu lain membaca dan membandingkannya dengan awal Anda membaca. It should be at least 30 degrees cooler. Harus setidaknya 30 derajat lebih dingin. | ||||||||||
skip to main |
skip to sidebar
About Info, Tips dan triks, How to, Solution and Troubleshooting


Popular Posts
Categories
Barack Obama
(22)
Evo 3d HTC Setting Online
(38)
Gadget
(36)
Info
(165)
Night
(10)
Phenomenal
(22)
about info
(150)
actris
(22)
all over the world
(149)
celebrity
(28)
crailist all over the world
(22)
entertainment
(36)
hot trend
(47)
how to make
(24)
indonesia Info
(23)
news
(180)
Archives
Total Pageviews
Copyright © 2011 All About ,Tips And Tricks ,info and ,News | Powered by Blogger
0 komentar:
Post a Comment
All About How To..,Tips And Tricks